
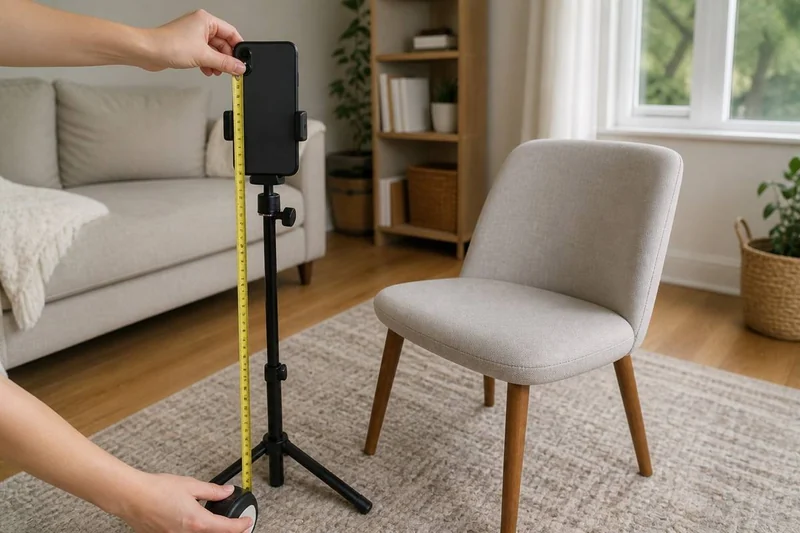
The short answer
For a straight-to-camera vertical video, the useful target is usually the height of the phone's active camera lens at your eye level, not the maximum inch number printed in a product name. Measure that target while sitting or standing in the position you actually use. Then judge a tripod by whether its lens can reach that height, hold the phone vertically, fit the available floor space, and remain steady in a test recording.
That answer comes from a consistent framing principle rather than one universal tripod size. UC San Diego's video guide places the camera at eye level and the subject's eyes around the upper third of the frame. The University of Connecticut's self-filming guide also recommends a flat, stable surface at eye level for portrait-oriented social video.
Vertical orientation changes the shape of the frame; it does not create a new floor-to-lens measurement. YouTube currently classifies qualifying square or vertical uploads of up to three minutes as Shorts, but its Shorts guidance does not prescribe one tripod height.
Try this first
Test the height before buying anything:
- Choose the real shot: seated introduction, standing introduction, waist-up demonstration, or hands-only work surface.
- Put the phone on a wide, stable dresser, shelf, or table near the intended camera height. If it needs a little lift, use a short, square stack of sturdy books on that surface and brace the phone against a heavy, nonslip object.
- Keep the phone well back from the edge. Do not build a tall freestanding stack or place the phone where it could fall on someone.
- Turn on the camera grid, frame your eyes near the upper third for a talking shot, and record ten seconds. Apple documents the current Grid and Level controls under Camera settings.
- Watch the clip. Move the support or your chair until the angle and headroom look natural, then measure from the floor to the center of the camera lens.
That measurement is your target lens height. A no-buy setup may already solve a fixed seated shot. A tripod becomes more useful when there is no suitable surface, when the camera must move between several heights, or when you need a repeatable footprint and orientation.
Which version of the problem do you have?
Seated talking introduction
Sit normally first. Measure your eye height from the floor, then reproduce it with the camera lens. Do not use your standing height or the height of the phone's screen as a substitute.
Standing talking introduction
Mark eye level on a wall while wearing the footwear you normally film in. The tripod needs to place the active lens at that mark in the intended portrait orientation. If that requires the stand's absolute maximum extension, treat stability as an unanswered test—not as a proven feature.
Hands-only or product demonstration
Your body height is not the deciding measurement. Start with the work surface, the amount of the scene that must fit in frame, and whether the camera is in front, at 45 degrees, or overhead. An ordinary vertical stand may not provide the sideways reach needed for a true overhead view.
Full-body or intentionally high/low angle
Compose the actual shot before shopping. Eye level is a neutral talking-head starting point, not a rule for every creative angle. A wider view can change camera distance, floor space, and the height that looks right.
Step-by-step shopping measurement
Write down these four numbers before comparing stands:
- Target lens height: floor to the center of the active camera lens.
- Available footprint: the clear floor width and depth where the legs can sit without blocking a walkway.
- Camera distance: lens to your normal speaking or demonstration position.
- Phone-with-case size: measure the device in the case you will actually use, including any grip or accessory that stays attached.
For Derek's iPhone 12, Apple lists a bare-device width of 2.82 inches and height of 5.78 inches in its technical specifications. A case changes the real dimensions, so a compatibility statement based only on the bare-phone number would be incomplete. The case-on fit and side-button clearance still need a physical check.
When a product may help
A tripod can help when the shot needs a height, angle or position your existing furniture cannot provide. Compare the tripod and shelf setups using the shot you actually want to record.
Before choosing a stand, check:
- whether the active lens reaches your target height with the phone in portrait orientation;
- whether the clamp fits your case and leaves buttons accessible;
- whether the open legs fit the available space and leave a clear walkway;
- whether the head reaches the angles your demonstrations need; and
- whether a remote is compatible with the phone and camera mode you use.
Once set up, record a short clip at the intended height and review framing and movement. The phone-framing checklist gives you a repeatable way to check the shot.
What not to do
- Do not buy from the advertised maximum height alone. Measure lens height in the exact phone-and-clamp orientation you will use.
- Do not treat a manufacturer's stability language as hands-on proof.
- Do not balance a phone on a tall, narrow household stack, especially above head height or near an edge.
- Do not assume a bare-phone compatibility range includes your case or clears the side buttons.
Choose the support around your shot
Measure your target lens height, try a stable surface first, and buy only if the missing adjustability is worth solving. For a normal vertical talking intro, eye-level lens placement is the useful benchmark. For POV and hands-only work, the surface, angle, reach, and footprint matter more than your standing height.