
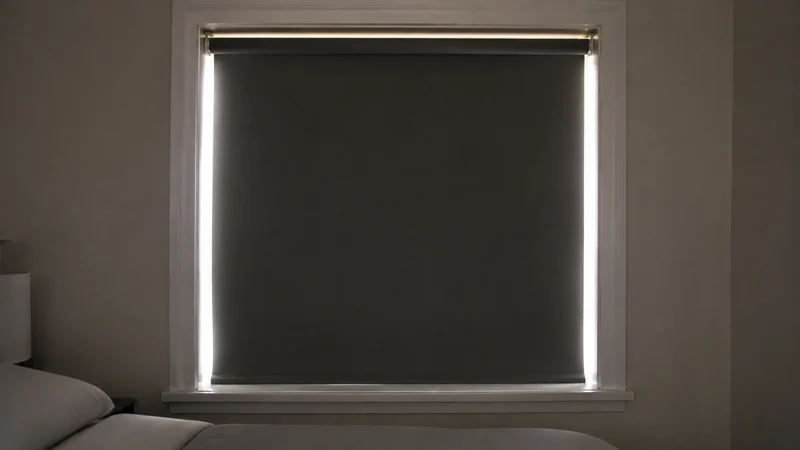
First decide whether the light crosses the material or goes around it
“Blackout” usually describes the shade material. It does not guarantee that the installed treatment seals every path around a window. An inside mount needs clearance to move. An outside mount can sit away from the wall. A headrail, roller, sill, seam, or out-of-square opening can leave a path even when the center is opaque.
The easiest first observation is shape. A glowing center points toward material transmission or damage. Thin bright lines at the sides point toward coverage or mounting clearance. A bright cap or crescent points toward the headrail, roller, or an uneven opening.
Map the leak under one repeatable condition
Choose one daylight window and lock the phone camera's exposure if you take photos. Turn off interior lights, close the shade the same way each time, and inspect six zones: center, left, right, top, bottom, and any seam.
| What you see | Most likely lane to inspect | First reversible check | The catch |
|---|---|---|---|
| The center fabric glows evenly | Material opacity, color, coating, or damage | Hold a separate opaque panel over a center section | A phone camera can exaggerate or hide small brightness differences when exposure changes |
| Thin vertical light lines | Shade width, factory deduction, inside-mount clearance, or an out-of-square recess | Temporarily hold an opaque strip beyond one edge without touching moving fabric | Added overlap can interfere with movement, trim, locks, or the window itself |
| Bright top line or top corners | Headrail, roller direction, valance, or top-blocker geometry | Hold an opaque strip above the headrail and compare | Do not obstruct the mechanism or ventilation path |
| Bright bottom line | Sill shape, short shade, unlevel bottom rail, or an uneven opening | Lower the shade fully and compare left, center, and right contact | Extra length can bunch or make normal operation worse |
| Light at a seam between panels | Overlap and panel alignment | Increase temporary overlap in the mock-up | Wider overlap can reduce usable opening and look bulky |
| Shade shifts, drops, or opens unevenly | Pressure, adhesive, surface, rail level, or wrong width | Stop operation and recheck the exact installation guide | Adding pressure or adhesive beyond instructions can damage the frame or mechanism |
This is a diagnostic, not a promise of total darkness.
Side gaps are often an inside-mount tradeoff
The Spruce's current blackout-shade test shows the distinction clearly. Its exact no-drill LazBlinds cellular shade was easy to install and remained stable through the reported test period, but the tester still observed noticeable gaps along the window frame.
That finding does not mean every pressure-fit shade leaks the same amount. It does show why replacing dark fabric with darker fabric may not solve a bright outline. The path may be the clearance required for the shade to move inside the opening.
Compare inside coverage with temporary outside overlap
Hold a dark panel so it overlaps the opening at the top and both sides. Do not attach it to finished paint during this test. Compare the perimeter with the inside-mounted shade under the same daylight and camera exposure.
If overlap materially changes the bright outline, the next decision is coverage: an outside-mounted treatment, side channel, layered curtain, or another permitted edge-control method. If it does not change the light, inspect the material, adjacent windows, reflective walls, doors, and interior light sources instead.
Tracks reduce one problem by adding fit requirements
The SelectBlinds Click2Fit total-blackout system uses side and bottom tracks, top blockers, and optional sealing strips to control perimeter light. Its installation guide also tells the installer to test operation and add the supplied sealing strip when gaps remain.
That is evidence that edge control is a system, not just a fabric specification. The same system requires a deeper recess, a sufficiently square window, and a compatible frame. Tracks are therefore a different fit lane—not a universal patch to add to every existing shade.
Adhesive paper shades can leak at cuts and seams
A temporary paper shade avoids a bulky headrail, but it creates different failure points. Redi Shade instructs users to trim the shade and overlap units for larger windows. A crooked cut, narrow coverage, lifting adhesive edge, or panel seam can become the visible path.
Before adding more adhesive, inspect the surface and the removal instructions. A stronger attachment is not a successful fix when it damages paint, violates the lease, or makes the window inaccessible.
Do not fix darkness by breaking the window's job
After every temporary adjustment, open, close, latch, and unlock the window. Check screens, cranks, tilt latches, handles, ventilation, and the planned removal route. Do not cover a required opening or defeat normal access for the sake of a darker photograph.
If the window geometry itself is the problem, return to the no-drill measuring guide rather than stacking more material around an incompatible mount.
What this check cannot establish
This observation cannot measure sleep quality, energy savings, UV protection, noise reduction, long-term adhesion, fabric durability, or product life. Sun angle, cloud cover, exterior reflections, room color, camera exposure, and the observer's dark adaptation can all change how bright a leak appears.
Use the same window, time range, shade position, and camera settings when comparing changes. Keep the conclusion narrow: which path changed, and which did not.
Bottom line
A blackout shade can block light through its center and still leave a bright perimeter. Map the center, sides, top, bottom, seams, and hardware separately. Then choose the smallest reversible change that addresses the observed path.
If the correction requires a different mounting system, the research shortlist separates temporary adhesive paper, reusable pressure-fit cellular, and tracked perimeter-control lanes.