
The short answer
An under-sink cabinet is not one empty rectangle. The doorway can be narrower than the inside, hinges can intrude, and pipes or the sink bowl can divide the usable volume into several shapes. Measure those shapes before choosing bins, drawers, or shelves.
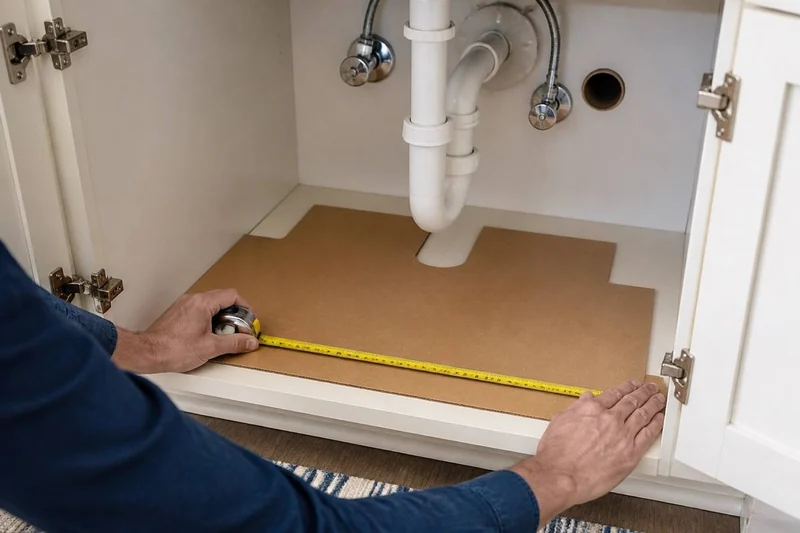
The fastest no-buy check is a full-size cardboard map. It can reject a layout that obviously blocks plumbing or cannot pass through the doorway. It cannot guarantee that a real organizer will fit or work when loaded.
Empty and inspect before measuring
Remove the current contents so the cabinet floor, walls, hinges, pipes, valves, and underside of the sink are visible. Do not organize around active moisture, an unexplained stain, a damaged cabinet base, or uncertain plumbing. This guide does not diagnose or repair a leak.
If the cabinet smells damp or musty, use the moisture-first under-sink check before making a template or choosing storage.
If household chemicals are present, follow their labels. The US EPA says hazardous products should remain in their original labeled containers and incompatible leftovers should never be mixed. Its child-safety guidance also says cleaning and pesticide products should be stored out of children's reach, with childproof locks used on low cabinets.
Record the cabinet opening
Start with the path an organizer must travel through:
- Measure the clear doorway width between the face frame or door edges.
- Measure the clear doorway height.
- Record the cabinet lip or threshold height.
- Open both doors and mark hinge intrusion.
- If a drawer or pull-out is being considered, trace its entire travel path—not just the space where it will rest.
A product can fit inside yet fail because it cannot enter or be removed.
Map the interior and obstructions
Record the full inside width, depth, and height, then add the measurements that make this cabinet different:
- clearance below the sink bowl and the lowest pipe;
- pipe and trap position from the left, right, rear, and front;
- shutoff-valve and connection locations;
- disposal, filter, hose, outlet, or other equipment zones;
- center divider, face-frame, hinge, and door intrusion;
- the path needed to see and reach plumbing without forcing storage against it.
Martha Stewart's current guide also recommends measuring both sides while considering pipe placement. That is general editorial guidance, not a universal tolerance or exact-product test.
Make the cardboard obstruction map
Cut cardboard or heavy paper to the cabinet-floor shape. Mark the wall edges, doorway, pipes, valves, hinges, and a visible no-storage service zone. If a specific organizer is later considered, place its advertised exterior footprint on the map.
Reject the proposed layout when the footprint crosses a fixed obstruction, cannot pass the doorway, covers the marked service area, or leaves no practical removal path. Do not bend the template into a convenient shape that the real product cannot match.
The map does not reproduce product wall thickness, feet, taper, rails, flex, loaded balance, or drawer motion. Compare the real exterior dimensions and manufacturer instructions later.
What to save for the later test
Keep the measurement sheet and template. When an exact organizer is available, record whether it enters without force, clears every obstruction, leaves the intended access visible, closes normally, removes for cleanup, and still works with the real contents.
Bottom line
Measure the path, not only the empty volume. A cardboard obstruction map can eliminate a bad layout before money is spent. Save it with your measurements so every organizer can be checked against the same doorway, plumbing, service, and removal paths.
Next, use the map inside the broader under-sink access-first organization guide.